Thursday, November 10, 2011

Different Models of Campy Triomphe Brakes

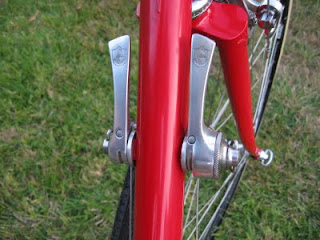
A while ago I needed a set of Victory/Triomphe brakes, where at least one was a standard (aka long) reach (needed for the rear wheel). I could not find a standard set in Victory (short reach pic below), the reason it turns out is they don't exist), so I bought a set of standard Triomphe. There was always something weird about one of the calipers but I installed them and they worked so I let it go.


I was now able to give a little for time to the weird Triomphe caliper. One thing that changed from Nuovo Record to C-Record was the brake adjuster Triomphe and Vicotry are of the C-Record era). The old style (Nuovo Record) was a divot on the top of the arm and a corresponding bump on the adjusting wheel. This was replaced with a system with no
divot or bump Above is a Victory without the divot and bump. Eventually Campagnolo went back to the divot and bump when C-Record was phased out). The above photo shows a Victory without the divot and bump and below is a NR with the divot and bump adjuster.


What is weird about this Triomphe is it has a bump and divot adjuster. At first I thought since Triomphe is a copy of Nuovo Record (Victory is Super record), someone must have graphed the left arm of a Nuovo Record caliper onto this Triomphe caliper, but after more research I discovered there are no NR or Record brake arms without Patent or Brev on them. I then discovered that indeed Campy did make a limited amount of Triomphe brakes with the divot and bump adjusters, so what I have is simply a mismatched pair. Below the brake on the left is the front with the common brake adjuster for Triomphe; right is the divot and bump


The brakes also came with mismatched pivot bolts, the standard adjuster with a rear recessed bolt and the divot and bump with an old style exposed bolt. This leads me to believe the divot and bump style was most likely an early style.

The calipers were sold as NOS from Bulgaria, so I guess it's the chance you take..

Wednesday, October 26, 2011

In search of the 14x26 freewheel

While the name Suntour does not necessary equate with vintage Campagnolo, freewheels certainly do. When I rebuilt my Specialized Allez I was thrust into the world of freewheels (previously I made due with the 7 speed Regina freewheel and 7 speed Syncro Shifters). I decided to de evolve the bike to a 6 speed and ended up with several Suntour New Winner Ultra freewheels, 13x21 cogs and 13x24 cogs; and a Suntour New Winner Pro in 13x22 (and a couple of Shimano 14x28).

When I put my Vintage Cross Bike together I also bought a Suntour "Perfect" freewheel with 14x26 cogs.

Below right is one of the New Winner FWs; the 13x22, The 13x24 currently resides on the Allez.


Unfortunately the Perfect 14x26 skipped badly when in the big ring as a result of the 2nd, 3rd and 4th cogs being worn. Below left are the cogs; it is quite difficult to determine if a freewheel is worn simply by sight.


which really don't look so bad. In the short time I used the the freewheel, I discovered the 14x16 setup was almost perfect for my riding. I also discovered that 14x26T freewheels are few and far between. You can find them on worn for ultra cheap freewheels. or in good condition for $100. The Perfect was one of Sun Tour's first imported freewheels and the lowest on the food chain; the New Winner came later and are near the top. But I figured there must be some similarity in construction so I concocted a plan to use parts from the Perfect to made the New Winner a 14x 26 freewheel.

I took the two apart by screwing the largest ring into my work bench and used a chain whip.


The New Winner is on the left and is constructed much like a cassette, however there are two size rings; 2 large (22 and 20), 3 middle 18, 16, 14 and a third size lock ring (13). The Perfect is on the right. It has the same size large rings only there are 4 (26,23,20, 18) and two smaller cogs (the same size as the middle rings of the New Winner, but they are threaded(16 and 14). My first thought was to simply replace the New Winner big cogs (22/20) with the Perfect (26/22); This went together okay, but the 4 tooth gaps between the 18/22 and 22/26 were too much. So I ordered some cogs from a web store named Loose Screws. As the site explains, the cogs are numbered (click on the picture below).

The New Winner cogs markings were a little different so I knew which cogs I wanted .It would have been a short order if Loose Screws had all the cogs, but they didn't. What I wanted was a 14T "S" threaded cog lockring, a 16T "F" cog and a 20T "A". What I ended up with was the14T "S", and a 21T "A" (the 21 "A" is also black and has the Suntour Accushift ramps and tooth configurations). I also saw a problem with the second cog on the New Winner so I ordered a 16T "L" cog hoping I could use it (turns out I could, but not in the way I planned. When the cogs came and I put the freewheel together the issue with the "F" cog fully revealed itself.

My plan was to create a 14/16/18/20/23/26 freewheel, so I need the 14T and a middle size 20T cog to make it work; with the 21T it would still be a 14/16/18/21/23/26, which I saw as workable. The problem was the second cog had a strange configuration.

As you can see the upper is a standard medium size 16T cog and the lower is still medium size but a F cog configuration. If you click on the first picture you can see how the F cog normally fits in the freewheel splines.

If you click on the picture below the first you can see how the 16T A cog does not engage the splines very well and when I tried to assemble it this way, the cog would tilt top one side. The 16T L cog that I hoped would solve the problem was something entirely different and had the same threading as the lockring. What I ended up doing is cutting up the cog with a Dremel and creating a cog similar to the F. The work is a little rough but it fit great (see below)


And below is the final product. I rode on it today and it worked perfectly. Yes it was a lot of work, but I learned a lot, slew a dragon and have a working 14x26 freewheel, all at the same time! Happy riding!

Tuesday, October 11, 2011

Shimano + Campagnolo Ergo = Shimergo

I have a 1999 Schwinn Peleton, which after a few years the Ultegra brifters (brake and shifter) started to get tired; meaning I sometimes had to "pump" the brifter to make it work. This apparently is common with Shimano shifters, especially the first 9 speed model (ST-5500/5501) , which is the model that came with my bike. The cause is two fold. First, Shimano shifters have a very light touch, which requires light (some may say weak) springs. Second the tolerances in Shimano brifters are very close; get a little grunge inside and it will slow down the workings. There are three remedies; the first is to spray the workings with a lubricant; the preferred make seems to be a silicone spray named LPS-2. The second is to try and disassemble the shifter and clean it out, but if you find a problem, your out of luck because Shimano sells no small parts for their brifters. The third remedy is to buy new brifiters. I decided the only reasonable remedy was the silicone spray. The bike was at the LBS at the time so I told them to do the job. Afterwards the shifters worked again, but I figured their days were numbered. The bike sat around for a while until I did the upgrades described above. Still the brifters needed to be replaced and I wasn't going back to Shimano.

I liked the looks and feel of the Campagnolo brifters, but I didn't have the money for a full conversion, plus Campy drivetrains are pretty restrictive. However, when I found the Shimergo web site, I knew I had the perfect solution. So what is a Shimergo? A Shimergo is a combination of a Shimano drivetrain and Campagnolo ErgoPower shifter. This website covers most the nuts and bolts on how to do it; Rear Shifting . For my bike all I would need is a set of 10 speed ErgoPower brifters. The compatibility issues between Campagnolo and Shimano is the rear cogs are further apart with the Campy cassettes. However as more cogs are added (ie a 9 speed to 10 speed) , the cogs are placed closer together to fit on the same size freehub body. This causes the cog spacing of a Campy 10 speed cogs to be more in line with the cog spacing of a Shimano 9 speed. Since the brifters determine the movements and indexing of the rear derailleur, a Campy 10 speed brifter would shift the nearly the same as a Shimnao 9 speed brifter.

Added to this swap is a re-routing of how the Shimano rear derailleur cable is attached, and you have a functioning 9 speed Campy brifter (the tenth shift is simply adjusted out with the high end stop) with a 9 speed Shimnao drivetrain.

The 10 speed shifters I decided to go with was a set of lightly use Daytona on ebay. The reason why I settled on the Daytona was #1 they were pre 2005 so I didn't have to deal with front indexing and #2, the Daytona name was a short lived, later changed to Centuar after Campy learned the name was a registered Trade Mark in the US.


To get ready in installing the new shifters I ordered some new Cinelli cork bar tape and a set of Campagnolo cables. Using the old bar tape is sometimes possible; especially if it is a dark color and isusually warpped opposite the original wrapping. I reused the original white bar tape until I received the second package of new tape (I'll explain later. The old tape is Cinelli white cork, so the bars looked a bit like a faded zebra.


Up to the Peleton, I had never worked on brifters and these were Shimano. I have wrapped numerous handlebars, including those with brake housings (aero) under the tape. until very recently, Shimano did not route their shifter housings under the handlebar tape, but from the beginning Campagnolo did. Many competition handlebars have grooves for the housings. Whwn I took off the bar tape on the Peleton, I was happy to see the handlebar had grooves in the back and front so it can accommodate both the housings. That is not to say that without the grooves you can not use the handlebars, it just looks a little cleaner.

It may not be obvious from this photo, but Campy has two routings for the shifter cables; one that would utilize a front groove if available and another where the shifter cable can share the same path as the brake.


After the placement of the brifters and taping down the cables, it time to wrap the bars with tape. I have always liked Cinelli cork tape. I had bought some Cinelli in gray and blue, but as I started wrapping the bar, it started tearing and eventually broke. I have never had this tape tear or break before so I feared the Cinelli tape quality had been compromised. Fortunately I tried another box of Cinelli tape and it was the quality I had grown to expect. This time I chose the Stars and Stripes (ie American Flag) cork tape.


Now that's handlebar tape! I have been warned however that the Cinelli printed tape tends to fade quickly; we shall see.

Wednesday, September 21, 2011

Building a Nuovo Tipo Wheelset

While collecting parts for my Vintage crossbike, I bought a pair of Nuovo Tipo 36 hole hubs.


From a Classic and Vintage forum "Tipo's were second tier, by 1982, paired with the Nuovo Gran Sport group. For a short time in the early 60's there was also a Sport hub from Campagnolo, not many of those around. Now, the cones on Tipos are close, but not the same as Record. But the cups pressed into the hubs are VERY different. Record gets the ground and heat treated units, Tipo does not. The outside diameter of the Record cup is larger than the Tipo. Long ago, I had the idea to "recordize" my Tipos, no go. The lock nut design and spacers are also different. Can't even exchange dust caps.

Many, but not all Campagnolo hub cones are date coded, if you take them apart to examine the mating surface. Tipo's can be as smooth as Record hubs in feel of the bearings, but for the very long term are not as durable. Tipo's are probably as good as most other competing brands top line wares long ago, with the exception of " Dura-Ace.

What is also great is these hubs are available in good-great condition for less than $50 @ set. I then needed a set of rims to go with the hubs. My initial idea was to use Sun M13II rims which have the old Mavic MA series box section rim look.


The problem with these rims is they are very common, so I continued to look. I eventually came across the Velo Orange PBP rim.
Velo Orange describes these rims as follows. For years cyclists have been lamenting the loss of the simple box section rim in a shiny silver polished finish. So Velo Orange has worked with one of the premier rim companies in Taiwan to find a replacement. We researched different widths, shapes, and materials, and what was being currently sold. It quickly became apparent that we needed to offer an alloy doublewall rim. Doublewall construction adds a bit of weight as compared to singlewall (or open box) rims, but we feel a classic doublewall box design is far superior in terms of overall strength, load capacity, and impact resistance, particularly with modern aluminum alloys.

The two rims are similar enough that some have suggested that the PBP is simply a re-branded M13II. This simply not the case; first the PBP is made in Taiwan and all Sun rims are made in China (hence the PBP is twice as expensive). Like many of the parts the PBP is also polished to a high gloss.

Once you get a hub and rim, you need to determine the spoke lengths you are going to use; this is usually accomplished with a spoke calculator. The one I use is very simple but accurate; http://lenni.info/edd/. If the hub and rim are in the data base, all the measurements have already been done. If not you need the to measure the rim and hub to figure spoke lengths. If not there are directions on the site on how to take the measurements. One measurements that is necessary is the rim Effective Rim Diameter or ERD. This is simply the interior diameter of the rim plus the additional length needed to thread a spoke through nipple on both sides; this usually adds 5-6mm to the ERD; The PBP rims have an ERD of 606mm.


To measure the hub, you need to know the flange spoke hole diameter (both sides as some are different); the measurement from the left and right flange to the center line and the spoke hole diameter. With front wheels and most track or single speed hubs the flange to center line will either be the same or close enough to not matter much. With hubs made for gear clusters, the spokes on the right will be shorter, as the wheel will be dished to accommodate the gear cluster. These are the measurements I used.

Campagnolo Nuovo Tipo (small flange), front

Hub Measurements

Left flange diameter 39.0 mm
Right flange diameter 39.0 mm
Centre to right flange 35.0 mm
Centre to left flange 35.0 mm
Spoke hole diameter 2.5 mm


Campagnolo Nuovo Tipo (small flange), rear

Hub measurements

Front hub
Left flange diameter 44.0 mm
Right flange diameter 44.0 mm
Centre to right flange 20.0 mm
Centre to left flange 37.0 mm
Spoke hole diameter 2.5 mm

Plugging this info into the calculator you get two lengths for each wheel. For the front wheel they are the same; 294.6 mm Since it is always best to round up I used 295 mm spokes.

For the rear there are two sizes, 293.7 mm for the left and 292.1 mm for the right; I rounded the left to 294 mm and right 292 mm.

Building a wheel is a post or book unto itself. So I say for now that I laced up the wheels and this is how they looked.


Tuesday, September 13, 2011

Building a Better Looking Vintage Super Record Derailleur

A good definition of form over function is the Vintage Super Record (1974-1987) Rear derailleur. The reason is the Super Record (SR) Rear Derailleur was nothing more than a tweaked Nuovo Record rear derailleur designed to utilize a 28T cog; over the Nuovo Record (NR) limit of 26t. This was done by re-working the outer cage. The top photo below is the outer cage of a NR and the lower the SR. The pulleys are the same distance apart, however the upper pivot has been moved closer to the pivot. This in affect lowers the pulleys so the guide pulley is in a lower position and can utilize a larger rear cog.

So if you don't count weight, the only performance advantage that this era SR rear derailleur is this the ability to utilize these two additional teeth. Other than that, the parallelogram is exactly the same except for the new top and bottom plates; but all the parts of a NR and SR are interchangeable, because except for the outer plate, that are the same. But that didn't stop Campagnolo from claiming the SR as a huge improvement over the NR. The new top plate was supposed to be some exotic material , not just aluminum and the black coating used on the parallelogram ends and background for the Camapgnolo script was something other than common anodizing anodized. The shifting was touted as being extrodinary, but in reality is was exactly the same as the NR. Of course it does have titanium pivot bolts, but besides knocking off a few grams, they do nothing to increase performance.

But that is not say that being able to use a bigger cog or Titanium bolts are not wanted, but I never got the the new top plate. It was supposed to be new age, but it did not fit the rest of the components that were still the 1966 design. When Campy finally did upgrade to the short lived C-Record, they looked nothing like the graphics on SR rear derailleur (nor did any of the other SR components, which still followed the NR looks and designs.

The first SR rear derailleur had a much more subdued look; pretty much a NR rear derailleur, only with the black parallelogram ends and instead of the "Campagnolo Nuovo Record" script on the top plate it said "Campagnolo Super Record".


My vintage Specialized Allez has a NR and I would like to mount this 1st generation SR rear derailleur except for two reasons. The first is they are quite rare and command top dollar and second it would not be period correct. All the other parts are 1984/85 NR and SR. So my plan was to combine the NR and SR rear derailleurs to make a defacto SR rear derailleur that looks like a NR rear derailleur. I have done this before with Nuovo Gran Sport rear derailleur with very positive results; again all the parts for all three of these derailleurs re interchangeable. To gather the parts I would need a SR inner cage and titanium pivot bolts. A while back I found a wrecked SR rear derailleur (see above) that had the lower titanium pivot bolt; it also had the inner cage, but that is being used on another derailleur on another bike right now. It was missing the upper pivot hanger bolt, which is not uncommon. These have a strange history as it was thought by many that the titanium hanger bolt was flexy and easily broken. There was probably little truth behind this, however it was common for racers to switch out the titanium hanger bolt for a NR steel bolt, which makes this bolt harder to find. I did however find one NOS at a web store and bought ot for much more than I should have. But then I had put this plan on hold until I found another SR inner cage. My patience paid off when I found someone selling the NOS SR inner cage on ebay; now I can finally put it all together.

What first needs to be done, is remove the cages off my NR rear derailleur. This is done by unscrewing the lower pivot.


Next I switch the pulleys from the NR outer cage to the SR outer cage; many refer to this as the inner cage or inner cage plate. However Campy situates parts starting from the frame, so the cage that holds the pulleys are referred to the inner cage and this cage, because it's farther away from the frame is the outer cage.


Next I attach the SR cage and pulleys

Next I load the spring, screw in the holding pin, and insert titanium upper pivot.


And viola! A stealthy SR rear derailleur that fits with the other components and is period correct. Not only that, I can now use a 28T freewheel if the mood takes me..

Wednesday, September 7, 2011

Making New Components Work as Vintage

I really like vintage Campy components. I scour the ebay and other sources (craigslist is a non-sequitur in this area). Saying that, there are some components that are either too scarce and/or expensive to use on a regular basis. One of these are chainrings for my Nuovo Gran Sport (NGS) crankset; NGS chainrings in 144BCD often cost more than Nuovo Record. While I have some OEM chainrings,


I ride the bike a lot and don't want to wear them out. Origin8 have some since retro rings that come in 42T and 52T (they have a much larger selection of retro track (1/8) rings, but only these two in 3/32). I like the dull finish that is similar to NGS, the 42T is a standard 10 hole, but the 52T is also a 10 hole, which looks awful.


So I bought a set and went to work with a Dremel tool to turn the 10 hole into a 5 hole. Below is my new set with a Origin8 52T converted to a 5 hole.

Restoring a Bike to its Old Glory


I have been spending so much time talking about Campagnolo components I am tempted to start another blog in that name; this is another one. A while back I identified all the Campagnolo components on my Specialized Allez. All the components were Nuovo Record, except the shifters and derailleurs that had been "upgraded" to the C-Record shifters and C-Record era Chorus Derailleurs below.


While these are very nice components, I just felt they did not belong with the Nuovo Record parts so I endeavored to restore the old style drivetrain components to their old glory.

Here is the new side view.


The classic Nuovo Record Shifters


The front Derailleur with the very classy clamp.


And the pièce de résistance, the Nuovo Record rear derailleur.

This little gem was lasted almost unchanged for 16 years as the must have racing derailleur. There were some incremental changes however, each getting it's own yearly patent number. I looked to find a late model; this being a Pat 84. There are simply a jillion of these derailleurs out there but they are still quite pricey. I actually found this one in Poland. Turns out the pulley back plate was bent (a very easy fix) and the pulleys are Shimano. The OEM pulleys for these are quite pricey and hard to find, but there are some high quality replicas for about $30, which I will be purchasing in the near future. The NR derailleur was rated for 6 speed, but handle pretty much any tooth count about up to 8 speed. I have retained the 7 speed 13-23 freewheel for now, but I have a 5 speed in reserve. My reasoning for the 5 speed instead of the 6 speed, is because there is something still classic about a 10 speed race bike.

I have the Regina Extra chain that came with the other components but it is a couple of links too short. I have still run the chain through the derailleurs and it works great. I threw on a SRAM 8 speed chain and while it functioned properly, it was not as smooth as the Regina. I posted a request for some matching links on the Roadbike Review Vintage forum, and a gentleman that goes by "sewup dude" is sending be 4 links in the mail gratis; vintage cyclers are good people.